
Have camera and would like to contribute your own Google Maps? Well now that is possible thanks to a new feature of Google Maps that allows you to create your own "street view" and recreate the experience of walking down a street, a park or a beach.
According to Evan Rapoport, product manager at Google Maps & Photo Sphere, using the feature known as Photo Sphere of Google, users can now create their own virtual 360 degree tours in places frequented by the same way as Google Street View cars. The ability to add Photo Spheres to Google maps already exists since 2012, but this new function also allows them to "glue" the different spherical images to create a virtual tour for the Street View.
Creating photo spheres with an Android device
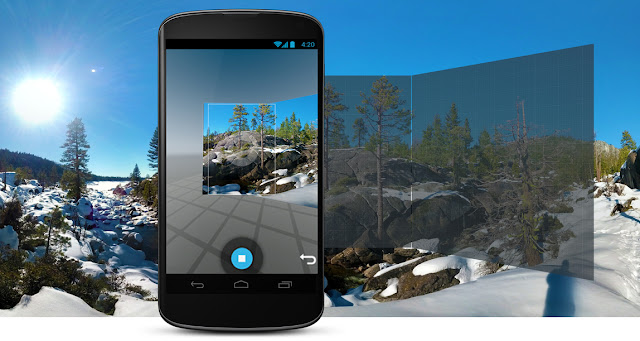
- From Camera's main screen, touch the current mode icon and then the Photo Sphere icon
.
- Hold your device vertically and close to your face level close to your body but positioned where you can both comfortably see the display and also tilt the phone to capture a full sphere.
- To capture the scene, adjust the camera angle so the blue dot is centered inside the doughnut. Hold the camera steady until a single frame of the scene and stop button appears
.
- Stand in the same place, rotating your camera slowly following the dots throughout the entire area you want to capture. You don't have to hit all of the dots but the more you hit, the more accurate and detailed your photo sphere will be.
- To create a full photo sphere, you'll need to complete a few rotations (typically 5) tilting your camera up or down to capture all areas..
- At any time while creating a photo sphere, you may click the undo button to retry the previous shot. This is useful if someone walks into part of your scene.
- To begin creating the photo sphere from the photos you just captured, touch the stop button at the bottom of the screen. It may take a minute or so to complete.
- To view your most recent photo sphere, swipe left on the main camera screen, and touch the Photo Sphere icon to pan automatically through the shot. You can also drag to move through the captured scene.
To share a photo sphere that you're viewing in Gallery, touch the Share icon  and select a sharing method.( Via : Google)
Here are the steps to create and share photo spheres with your DSLR
- Take photos: With a narrow aperture (giving a high depth of field), take a series of overlapping photos that together cover a full 360°. You can buy tripod mounts made specifically for this purpose.
- Capture location: If your camera features GPS capabilities, ensure both that this feature is activated and that you have a GPS lock when capturing the photos. If your camera does not have GPS capabilities, make a note of the location you’ve photographed so that you may add this information into the image file later.
- Stitch the photos: Using panorama stitching software of your choice, create a 360 degree panorama and save the image in jpeg format.
- Add the photo sphere XMP metadata: Using this site or software that supports the XMP standard, add XMP metadata to the jpeg.
- Upload: Ensure that you have checked Upload my photos at full size in your Google+ settings. Then upload your photo spheres to Google+.
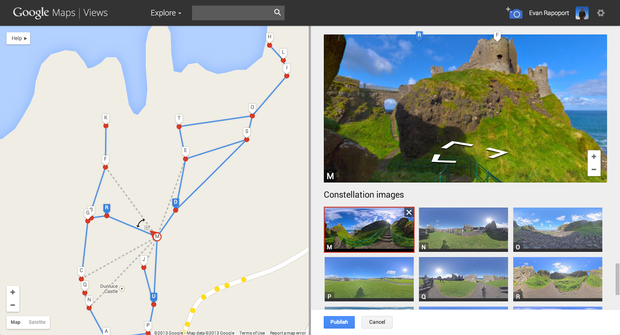
- Import your photo spheres: Go to Views, and click the import-from-camera icon
. Choose an album containing photo spheres, and select any photo spheres you wish to import. Add the location of each photo sphere if prompted. ( via : Google )
Have fun !


